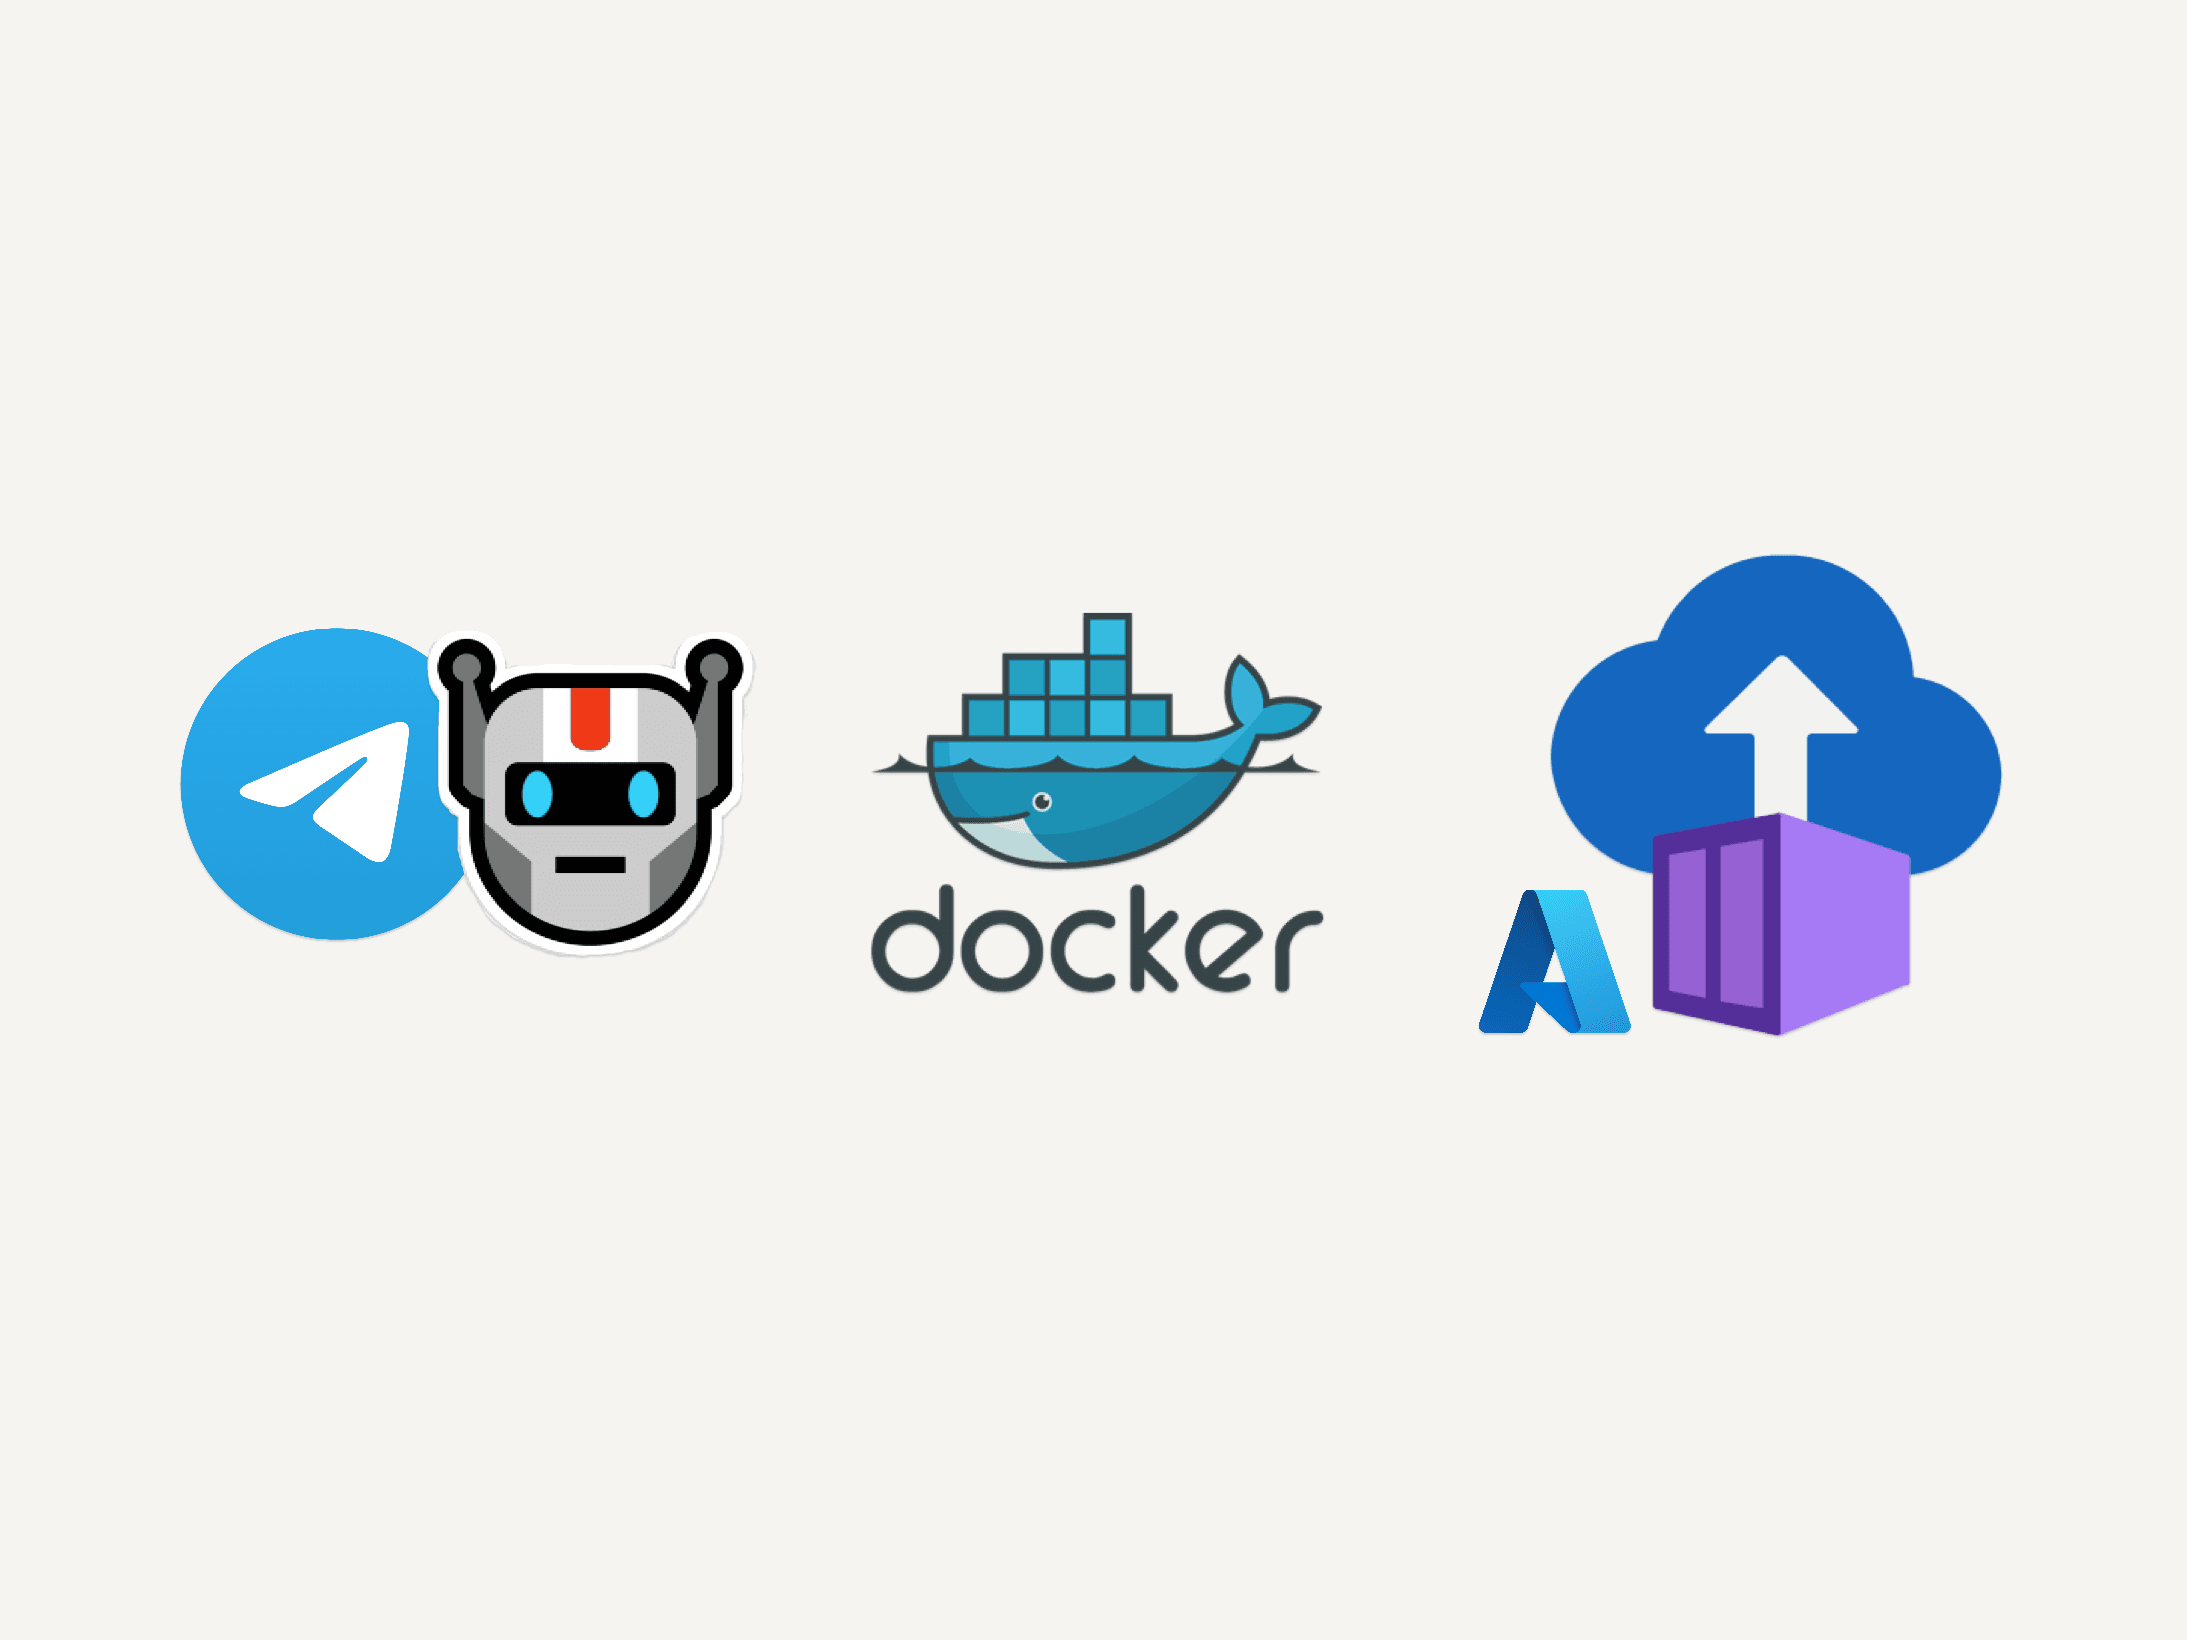
How to create a Telegram bot using Docker and host it on Azure
Hosting apps on the cloud is not as scary as they've told you
Introduction
Telegram makes it very easy for programmers to create a chatbot using their platform.
In this tutorial, I'll explain how to get started with a simple logic chatbot that replies to messages that contain a certain trigger word, and ignores the rest of the messages. The logic of the app in this example is very simple, but I want to show the full process from having the code running on your local computer to having the bot running as a service on a cloud platform like Azure.
Once you know how to deploy your app, you can modify the code and extend the functionality of the bot.
Prerequisites:
To have a telegram account
To have docker engine or docker desktop installed on your computer
A docker hub account. (it's free)
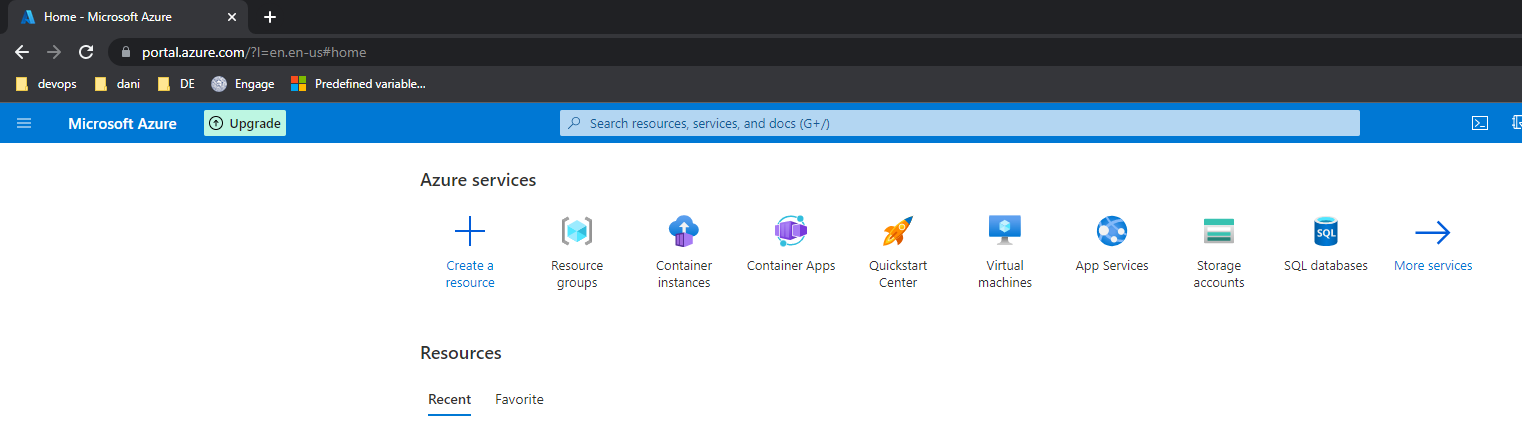
Create an Azure account with your Microsoft account. Follow the instructions on portal.azure.com.
Azure services cost money, but for new users, Azure gives $200 credit that you can use within a month, and if that doesn't apply to you, don't worry, running this app for a few minutes or even an hour to test it, will cost less than 5 cents of US dollar. Trust me, I ran it for a whole day, and it was $0.10.
Basic programming knowledge
Step 1: Create the bot entity in the telegram app
If you don't use telegram yet, download the app from the App store for iOS or Play Store for Android.
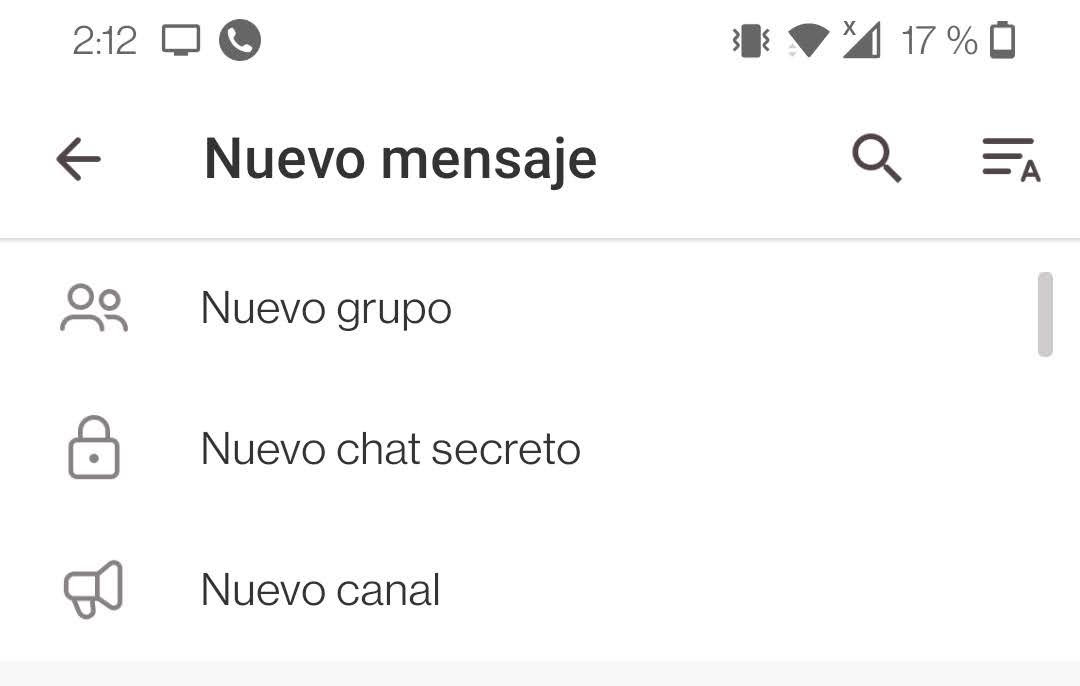
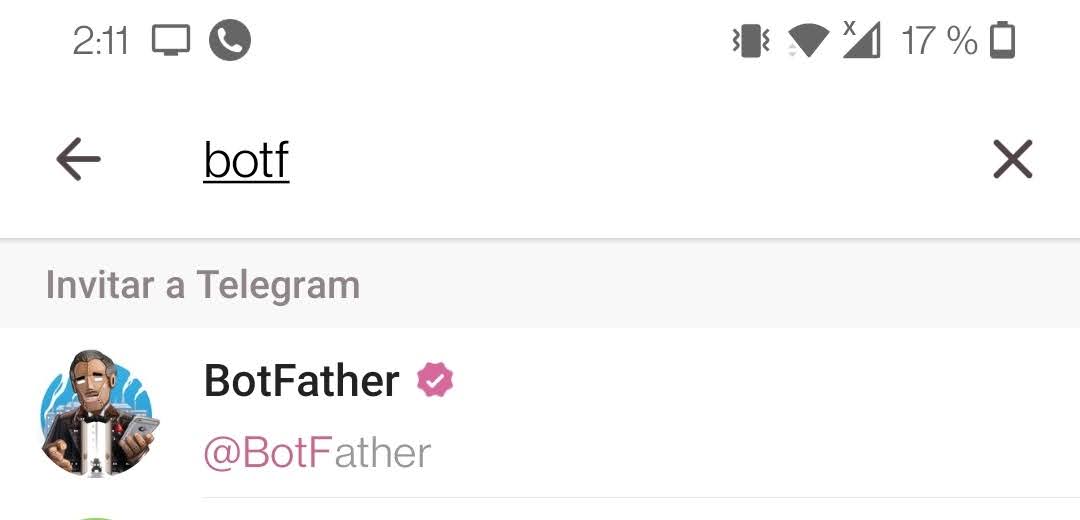
Start a chat with the user BotFather as with any chat. On the new message action button. And then use the search function and type "Botfather"
Once in the chat of Botfather, type the command /newbot , it will prompt you to choose a name for your bot, the display name that others will see, and then the username, which has to be unique amongst all the telegram users and must have the bot suffix. You can create as many bot users as you like.
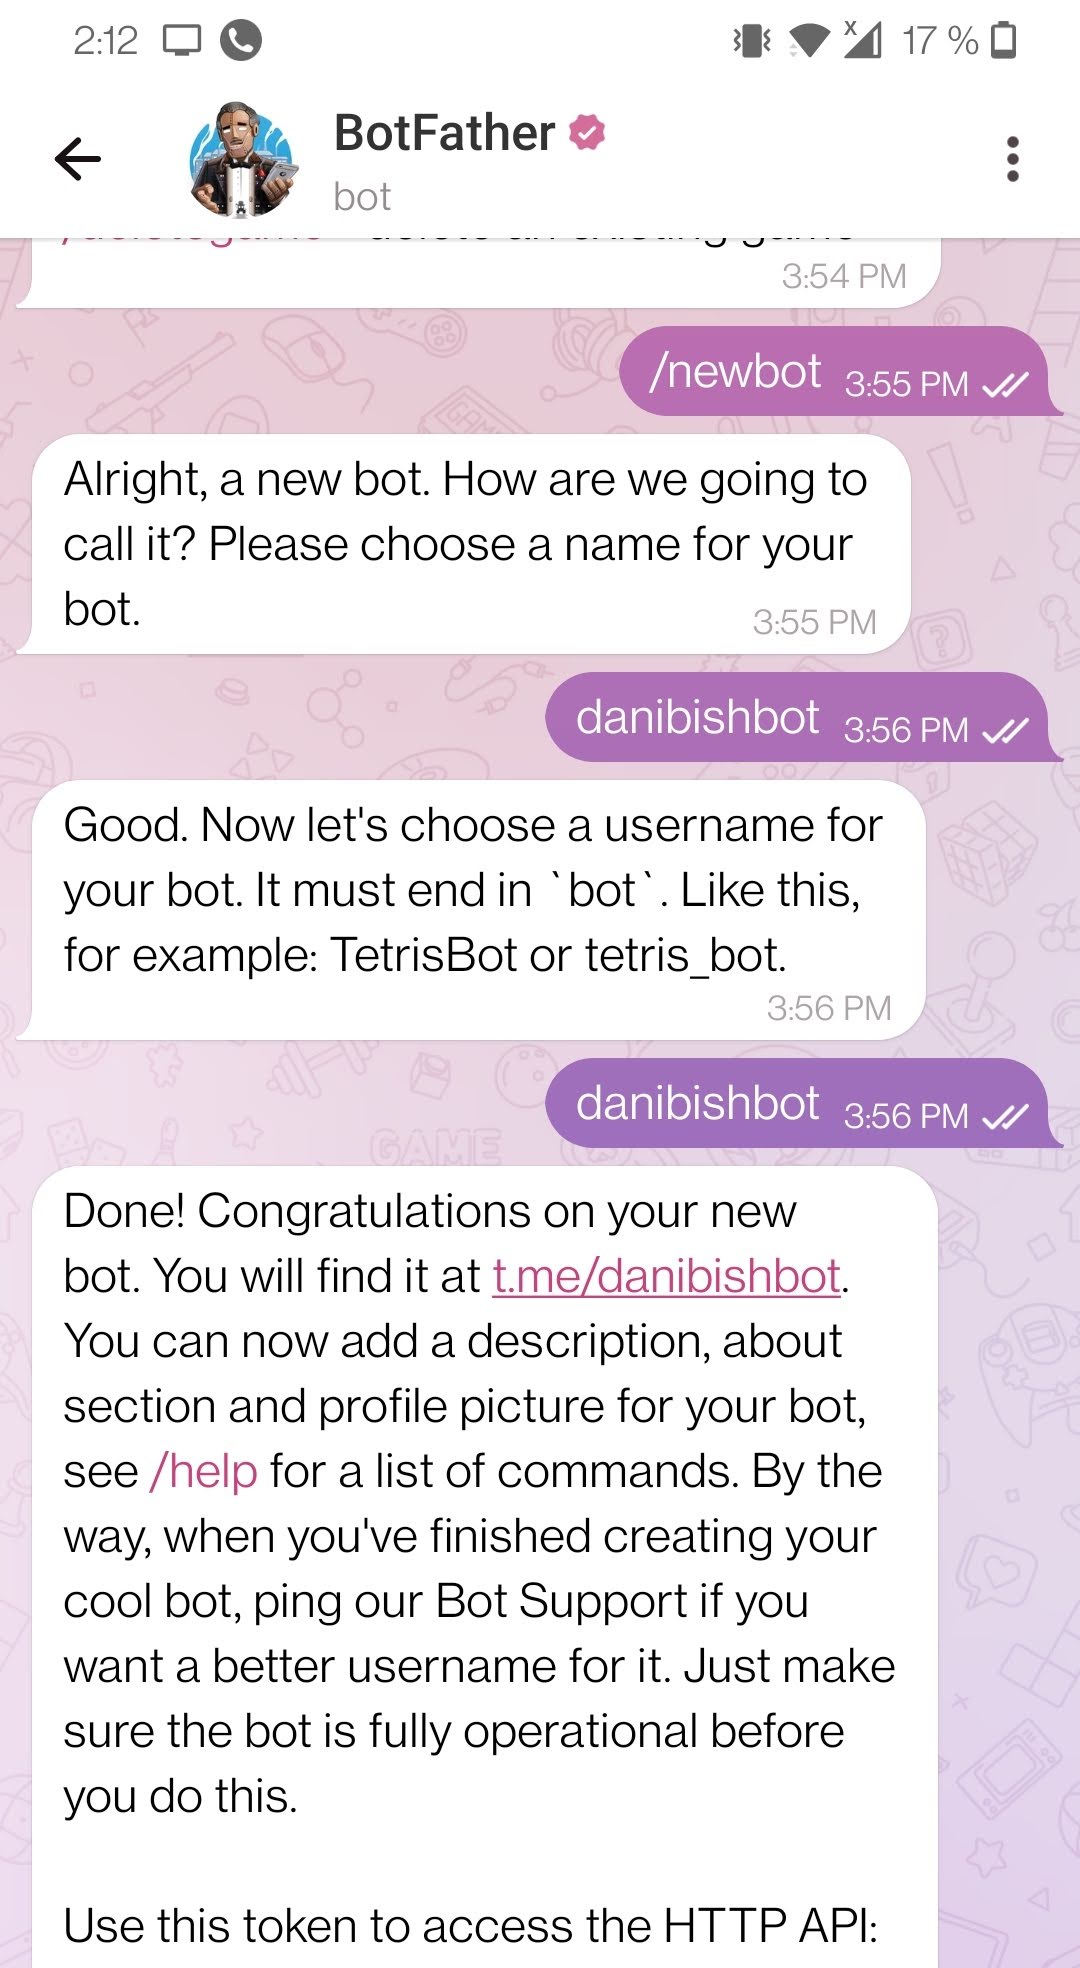
It will also give you an API Token string, save this for later and don't share it.
To learn more about Telegram bots, go to the official documentation.
At this point the front-facing part of the bot is ready and registered in telegram, now we need the backend to have something to work with and to be running.
Step 2: Clone the starter code from github.
Clone the repo from https://github.com/danibyay/telegram-bot-starter-code
This repository is written in Kotlin and compiles as a gradle project. If you haven't worked with these tools before, don't worry. All you need to know is that Kotlin is a language that needs to be compiled with JDK and then run in JRE, just like Java, (but more modern) and Gradle, will handle the dependencies, and the build process for us.
For local development and testing, you might consider installing IntelliJ or Eclipse as an IDE to be able to test new functionality before deploying, but it's not necessary to have that installed for the first version of your bot, as the starter code is ready to go.
Let's take a look at the Main.kt file located in src/main/kotlin
Here we import all the libraries from the telegram bot's API and there is the main function that will respond when we write to it.
@OptIn(PreviewFeature::class)
suspend fun main() {
//val botToken = args.first()
telegramBotWithBehaviourAndLongPolling(System.getenv("TOKEN"), CoroutineScope(Dispatchers.IO)) {
onContentMessage { message ->
val chat = message.chat
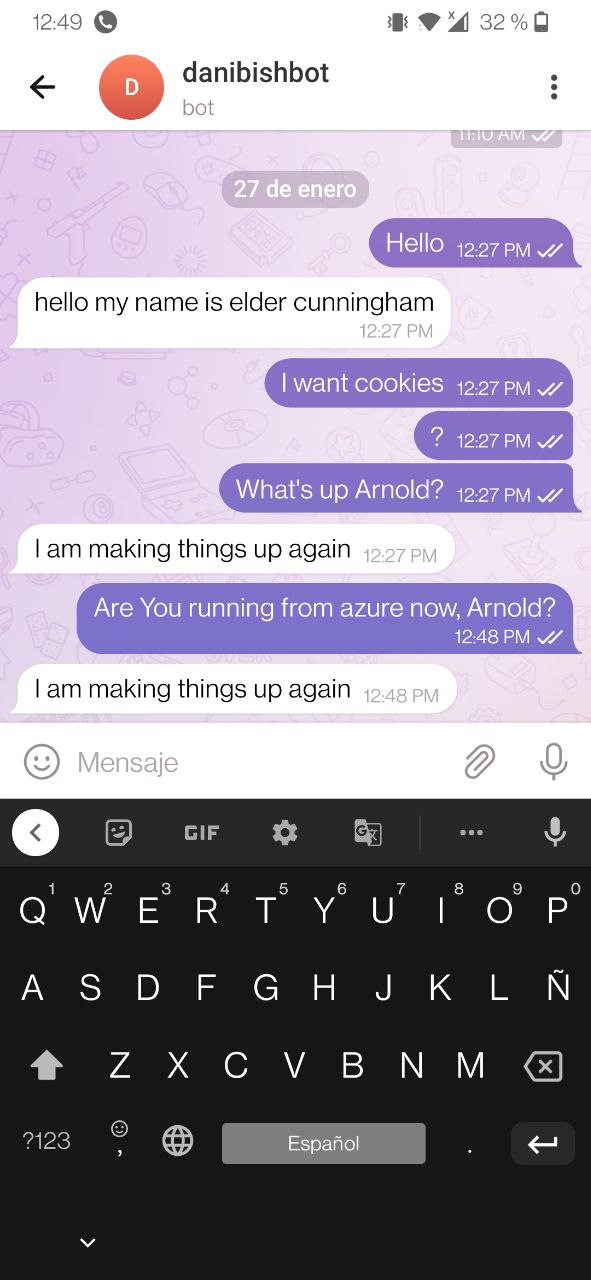
if (message.text?.contains("Arnold", ignoreCase = true) ?: false) {
send(chat, "I am making things up again", MarkdownV2)
return@onContentMessage
}
if (message.text?.contains("hello", ignoreCase = true) ?: false) {
send(chat, "hello my name is elder cunningham", MarkdownV2)
return@onContentMessage
}
}
allUpdatesFlow.subscribeSafelyWithoutExceptions(this) { println(it) }
}.second.join()
}
Here we can see that the bot will only respond when it detects the strings "hello" or "Arnold", this is where you can get creative, and give it an identity and some key phrases, without getting too crazy with natural language processing or any complex dialog. We just want to have fun and get this up and running, right?
So far, it's better to not modify anything to ensure the first version of your bot will work without any problems. And once you test it, you could go ahead and change the internal logic.
The other important file to know is the Dockerfile. Since we are going to run this with Docker, it needs a docker file to be able to know how to build and run.
FROM gradle:7.6.0-jdk8 AS build
COPY --chown=gradle:gradle . /home/gradle/src
WORKDIR /home/gradle/src
RUN gradle build --no-daemon

FROM openjdk:8-jre-slim

RUN mkdir /app
ENV TOKEN=XXX

COPY --from=build /home/gradle/src/build/libs/ /app/

ENTRYPOINT ["java","-jar","/app/starter-bot-1.0-SNAPSHOT.jar"]
The things to note here is that to build the image we will use gradle, and to run the image we will use openjdk (open java development kit)
Also, there is an environment variable called TOKEN, which is the token you obtained on step 1 from the botfather chat. Since we don't want to store the token publicly or in the image, it must remain separate from the app and be inserted at runtime. Leave the XXX as the value, don't write your token here.
We'll see how to insert it in a later step.
Things to keep in mind:
- If you want to change the name of the project (which is optional), you will have to do so in
settings.gradle.kts, and accordingly in the name of the jar on the DockerfileENTRYPOINTline
settings.gradle.kts
rootProject.name = "starter-bot"
Dockerfile
ENTRYPOINT ["java","-jar","/app/starter-bot-1.0-SNAPSHOT.jar"]
The version part of the jar name is declared in the build.gradle.kts file line 9
build.gradle.kts
version = "1.0-SNAPSHOT"
Step 3: Build the docker image and run it locally to test it
Open a terminal on the root directory of the repo and run the following command. (It must be the directory where the Dockerfile is. Don't forget about the dot at the end, which means that you want to run the build command on the current working directory (cwd)
Choose a name for your image, for example "my_first_bot"
docker build -t <image_name> .
This command may take a few minutes to run. Sample output is shown below. (only the beginning and the end)


Next, verify your image is in your system now, run the command
docker images

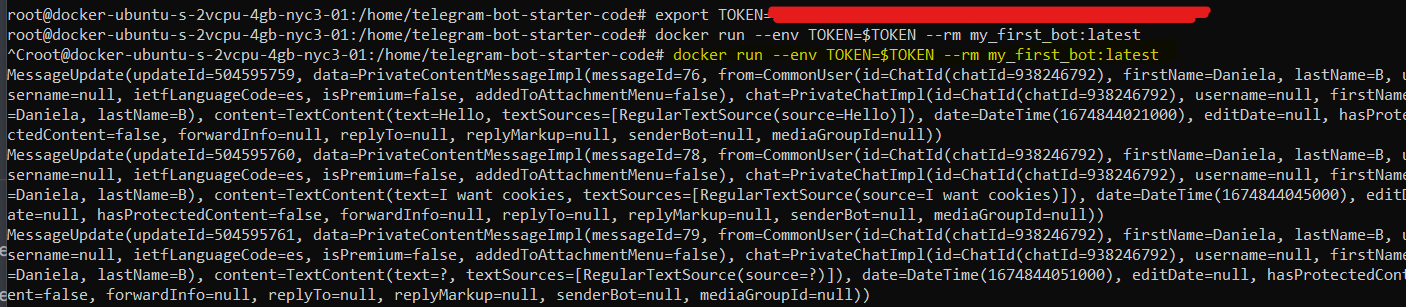
Now, we'll run the docker container with the image we have built, and write the API token from step 1 in the command line.
docker run --env TOKEN=XXXXXXXXXXXXX --rm <image_name>
By running the command like this, the log output will be right there in your terminal, and you can start using your bot now.
Step 4: Test your bot
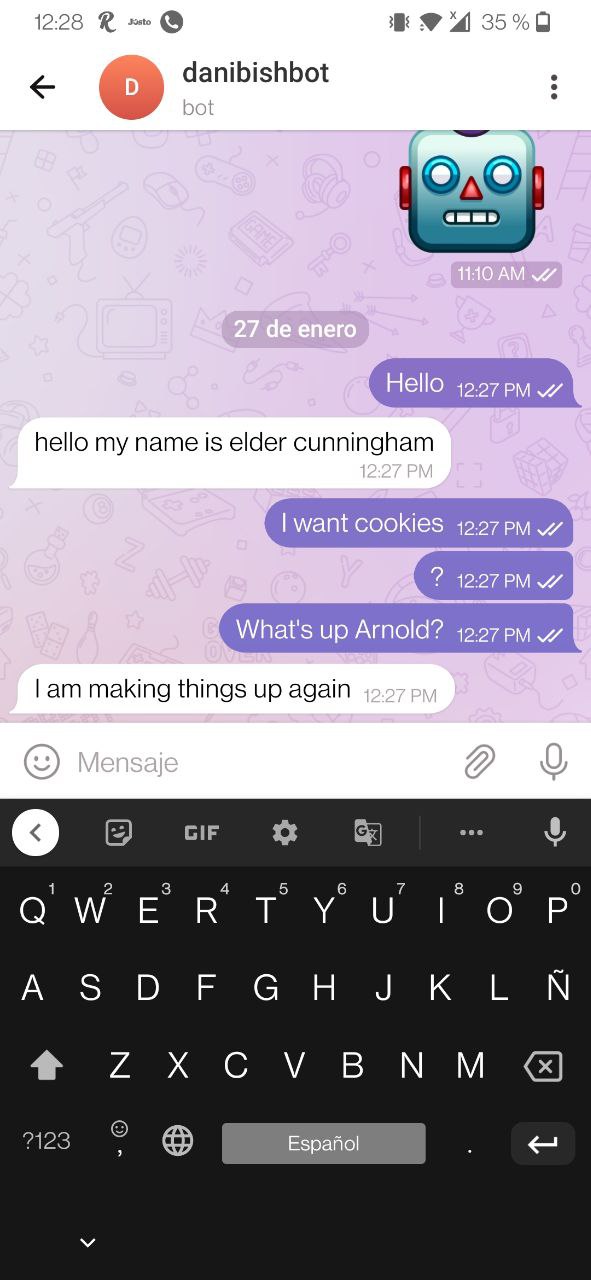
Now you can use the telegram app and start a chat with your bot, remember the username? time to use it. Talk to it with whatever messages you like, it should stay quiet, but if the message contains the trigger word, it should reply with what we coded in Main.kt
When you're done testing it, quit the container process by typing Ctrl + C on the terminal you started it or with the UI of docker desktop on the "stop button"
It is important to stop this container so that in step 6, we don't have two instances of the same bot running at once.
Step 5: Build the docker image and push it to docker hub
Now that we have confirmed that this code works with the new token, it's time to publish it on the internet. We are going to push the docker image to docker hub.
First, log in to docker hub from your terminal using docker login, it will prompt you for your username and password, and that's it.
docker login

Second, we need to rebuild the image now under our docker hub username and make sure that it has a tag.
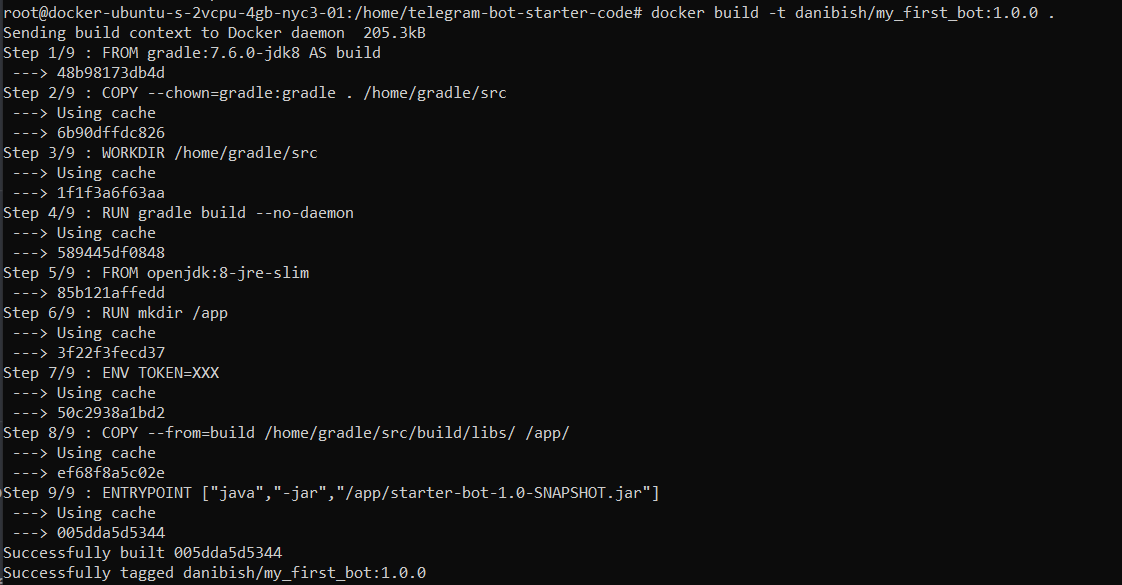
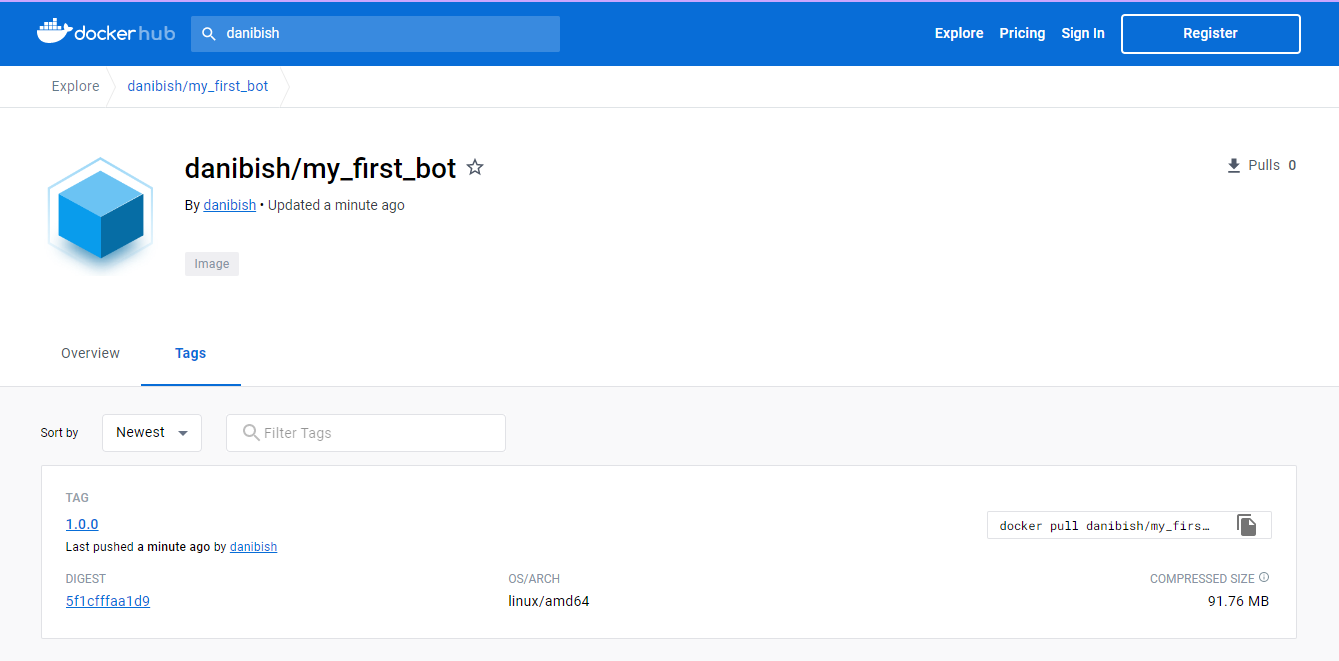
docker build -t danibish/my_first_bot:1.0.0 .
Since the code didn't change the build was very fast, we just retagged it.
Now, this image can be pushed to docker hub and will be available for anyone, but the token is still not part of the package, so anyone who wants to run the bot with our logic, would need to use a different token of their own.
Docker hub offers to host private images at a cost. If the image is public, hosting is free.
docker image push danibish/my_first_bot:1.0.0

If I go to docker hub's website, I can see that the image is now published there.
Step 6: Deploy your docker app in Azure Container Instances' Service
At this point, we've already run our bot app on our local computer, and we've seen that it works. So why are there more steps? Well, if we keep the app running on our laptop or home computer, that would make our computer a server, and if we want the bot to live forever, we would have to never again shut down the computer. Which is not ideal.
To solve this, we can borrow a server from a cloud provider, or better said, rent it.
Cloud providers allow us to use computing resources without actually owning them, and they guarantee us that the servers will always be available and well-maintained.
For this tutorial, I've chosen Microsoft's Azure as the cloud provider, and we will use their service "Azure container Instance" to run our docker app effortlessly.
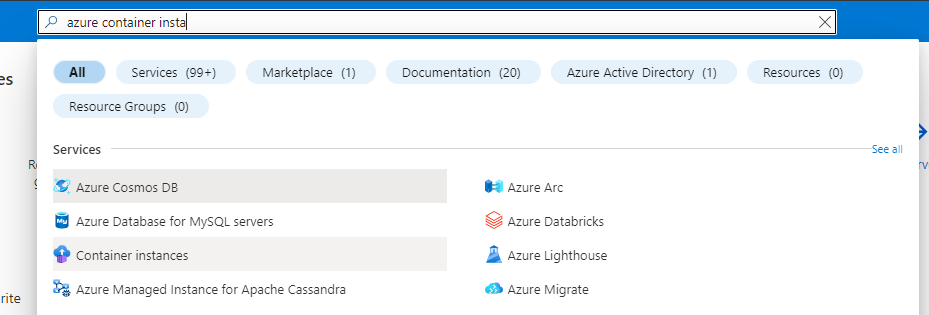
In the azure portal (portal.azure.com) use the search bar and type "Azure container instance" and select the option that has the icon with the blue cloud and a purple box.
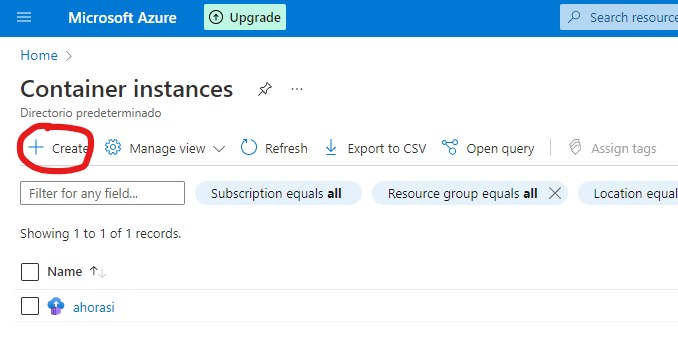
Click on the button "+ Create"
Fill in the fields of the Basics page
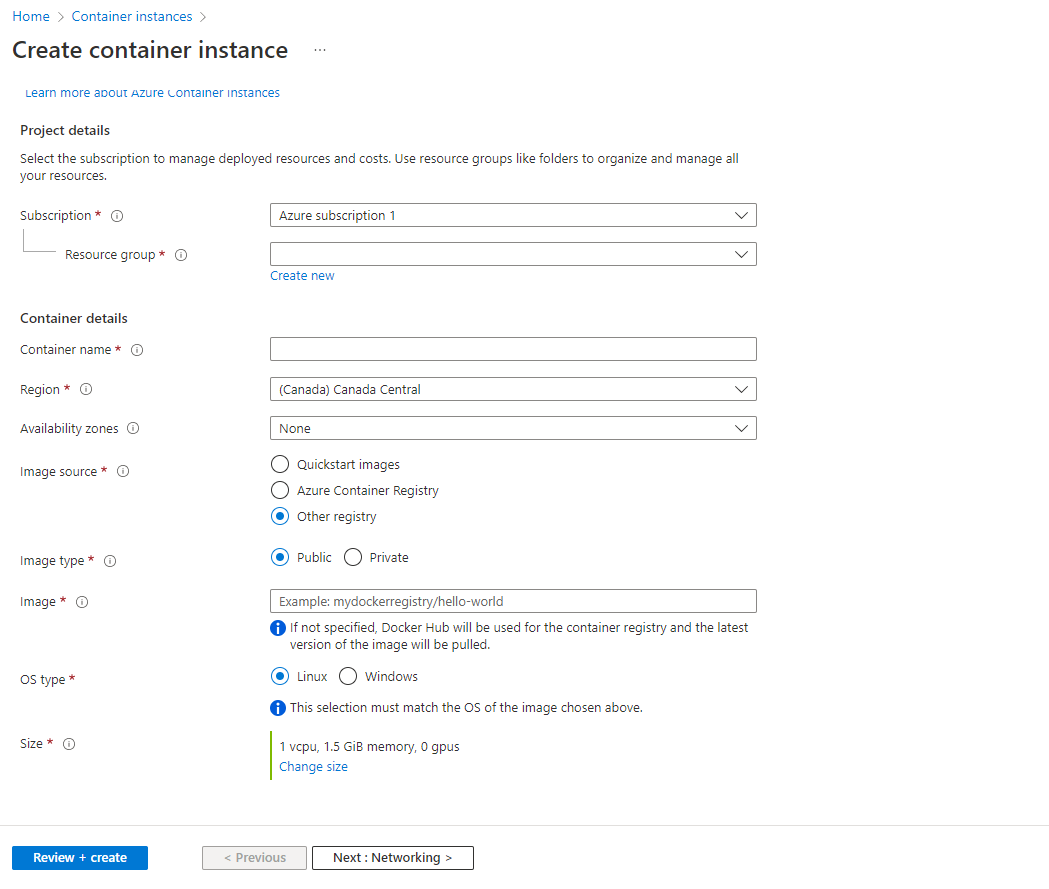
Resource group: Create new -> choose a name for the workspace where your container app will live, for example "
container_group"Container name: Choose a name for your app, for example "
mybot"Region: Choose the region closest to you, but avoid
us-east-1because sometimes it's very full. Example:Canada central.Availability zones: none
Image source: Other registry
Image type: Public
Image: Here you will type your dockerhub username, image name and tag as we wrote it when we did the push command in step 5. Example:
danibish/my_first_bot:1.0.0Os type: Linux
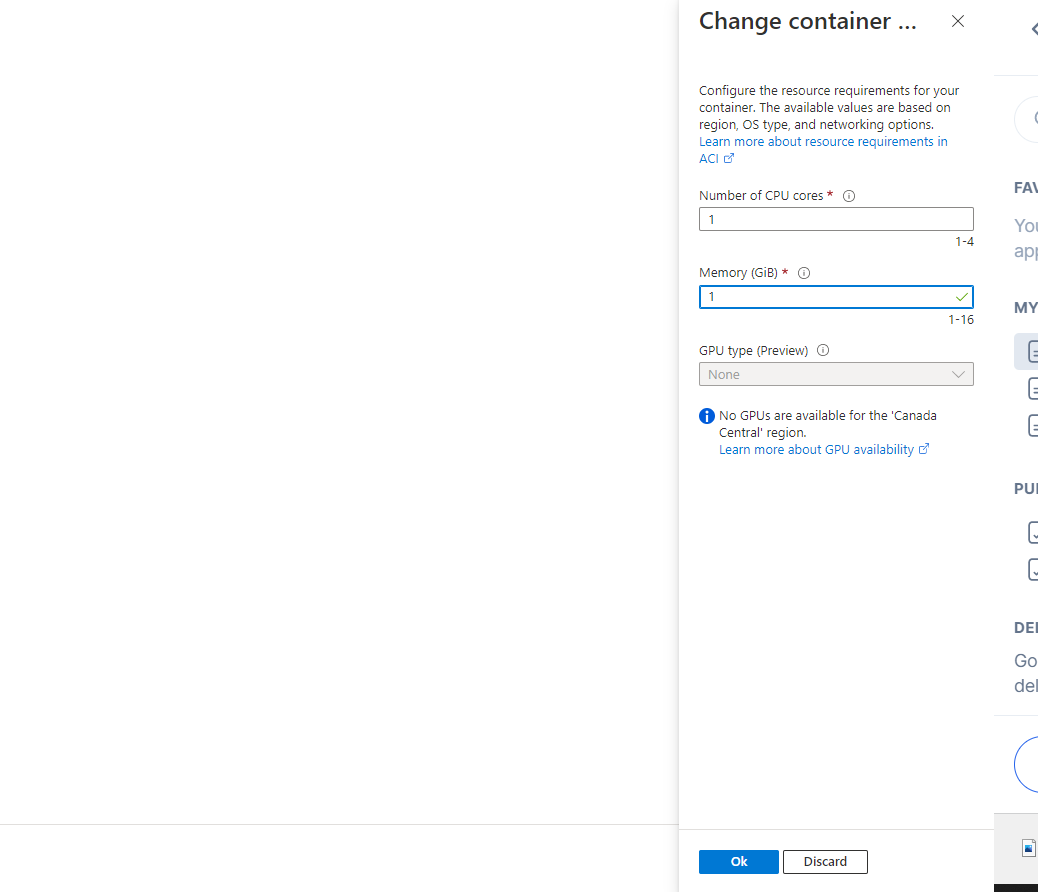
Size: Select change size to use only 1 GiB of memory, and then click "ok"
This is how my screen looks now filled in:

Now, we move on to the Networking Page
Add the port 443.

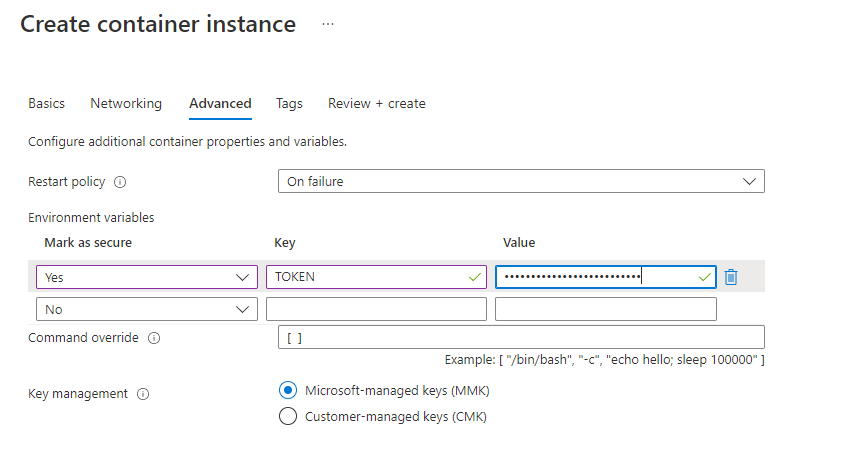
Now we move on to the Advanced page
This is the place where you will write the API Token value, and nowhere else.
Mark it as secure, type the word TOKEN in upper case, and copy-paste your API token from step 1.
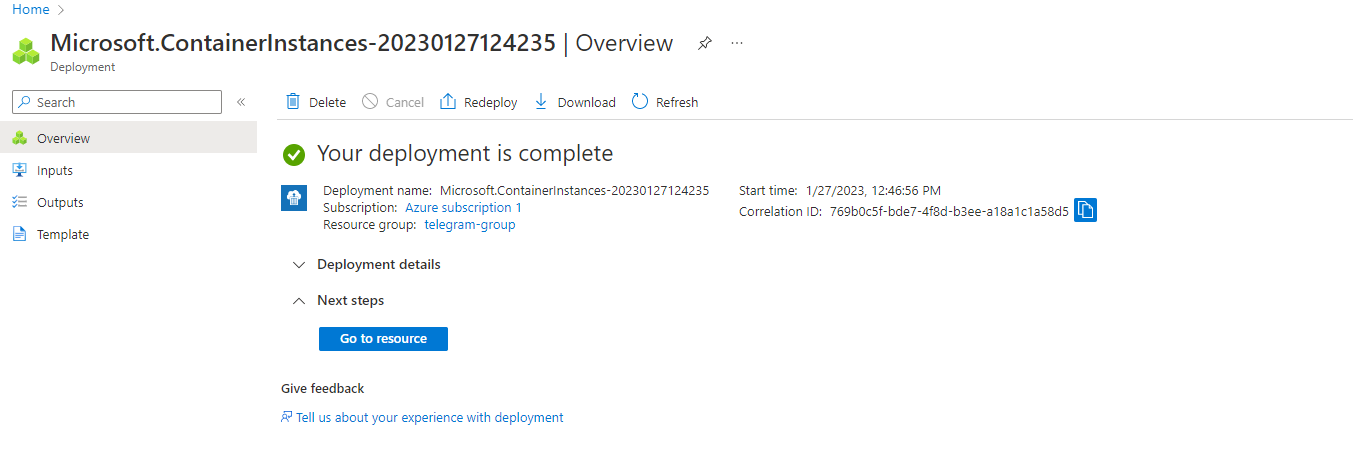
This is the last step, click on the blue buttom at the bottom of "Review + Create"
It will show you the progress of the deployment, and when it's ready, you can use your chatbot again.
Remember to stop the container you had running on your local computer from step 4. Telegram will run into issues if you have two bots with the same TOKEN running at the same time.
Now you can test it again
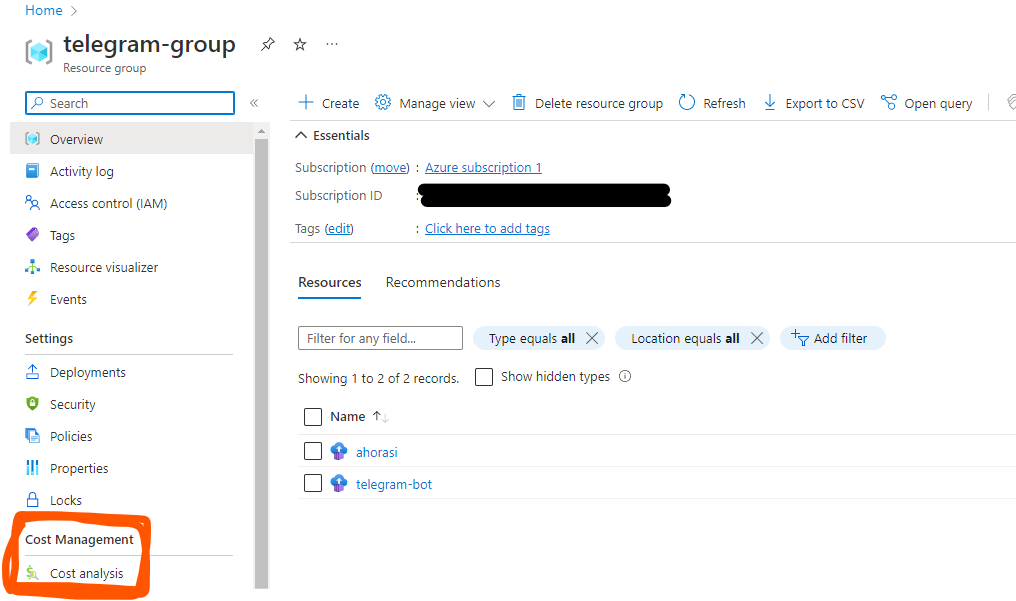
Now, on the azure portal, you can stop it, restart it, or delete it
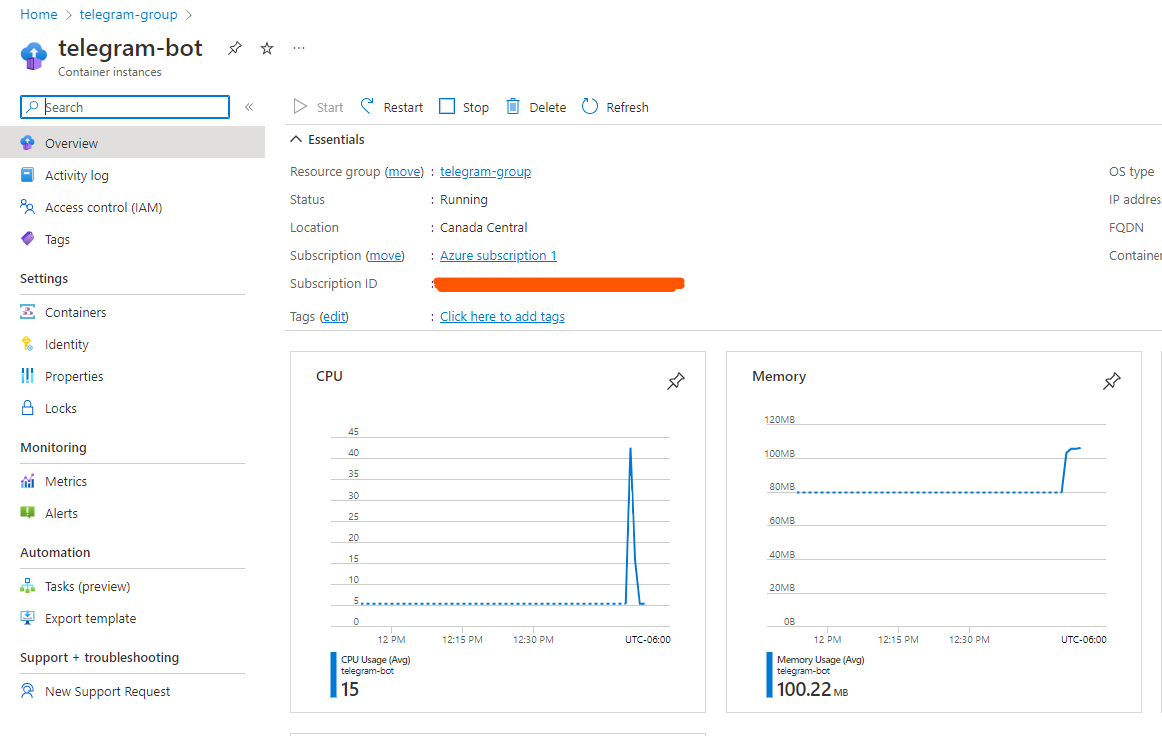
Azure container instances service for minimal consumption can cost less than $4 per month. It depends how many request it would receive.
You can check the exact consumption and predicted costs on the "cost analysis" menu on the side bar of the resource group where the container is in.
Step 7: Modify the code (optional)
Now it's time to play around with the Kotlin code and read more about the telegram API if you want to extend your bot's functionality. If you want to test locally, remember to stop the service in azure or elsewhere. Once you are satisfied with the modifications and the behavior, you would need to build the image again, with a new tag, for example:
docker build -t danibish/my_first_bot:1.0.1 .
Push the image with the new tag to docker hub
docker image push danibish/my_first_bot:1.0.1
And lastly, delete the container instance you created in azure from step 6, and create a new one that uses the new tag.
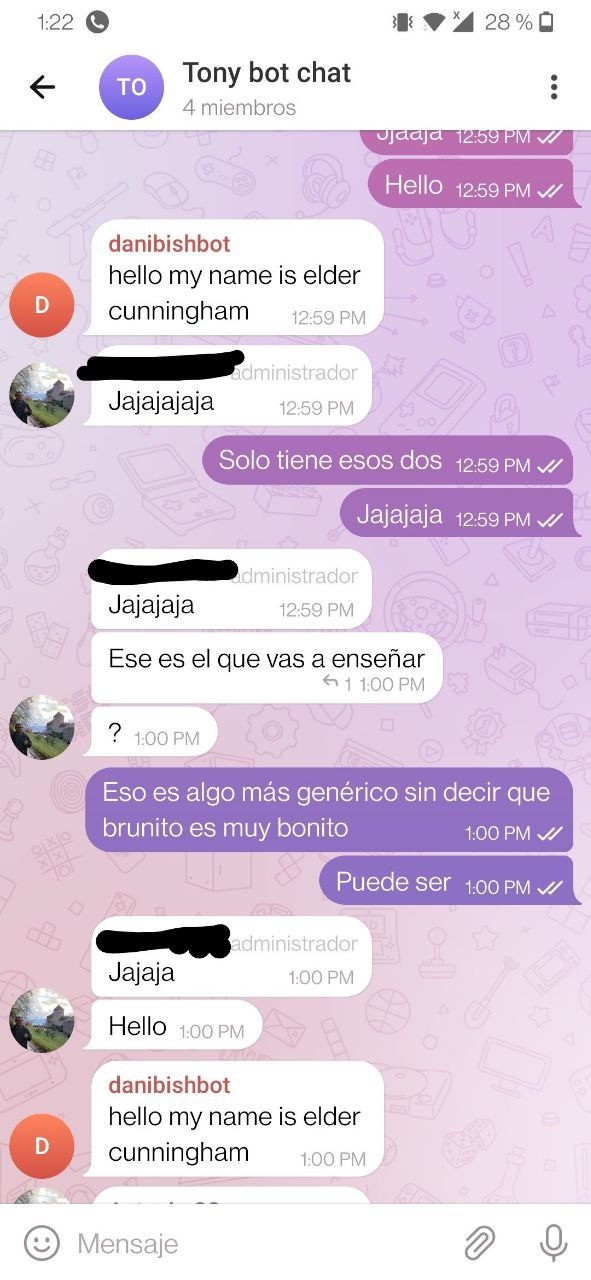
Step 8: Modify bot settings for use in group chats (optional)
So far, we tested the bot by writing directly to the bot in an individual chat. But it's also possible to add the bot user to a group chat, so that you and your friends can talk to it and see the responses together.
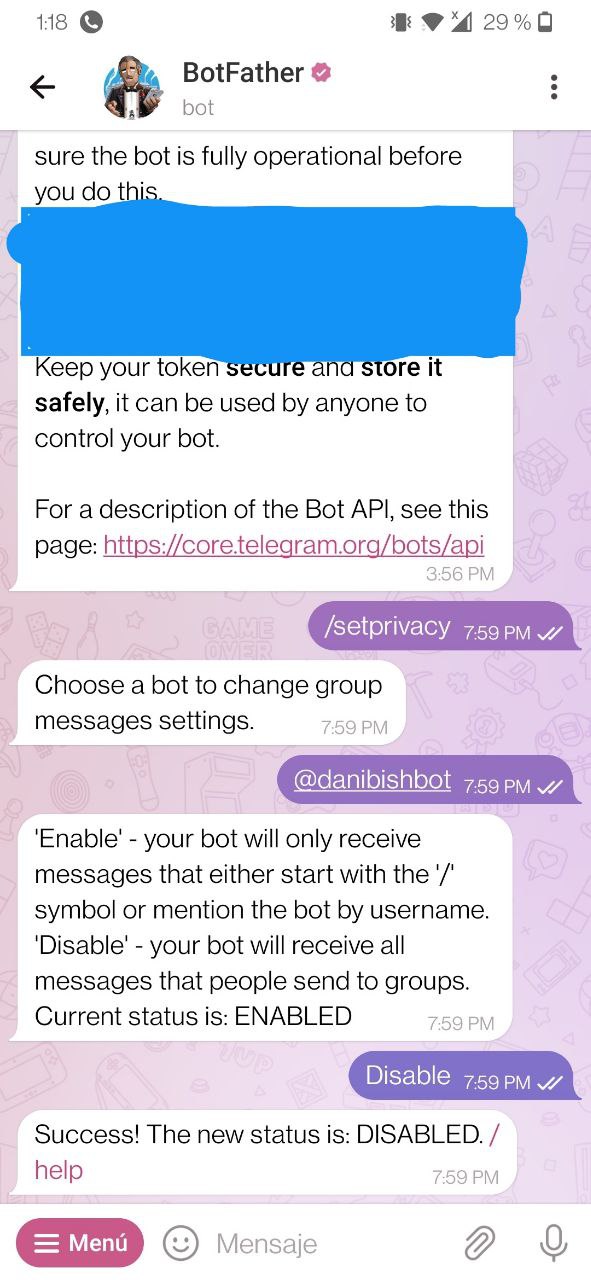
This doesn't work out of the box, it's necessary to give the bot permission to read the messages in a group chat. For this, you need to go to the BotFather chat and type: /setprivacy . Then, it will prompt you for the bot username that you want to modify its privacy settings. And finally, to type Disable, to allow it to read the messages in group chats.
And this is an example of using the bot on a group chat.
The end
I hope you enjoyed this tutorial and that you learned that hosting docker apps on the cloud can be easy.